Fix Blurry Canva Images for Print (And Why It Happens in the First Place)
You open the print order, and for a second you’re excited.
You remember how clean it looked on your screen – The spacing felt balanced, the colours popped, and the text looked sharp enough to professionally pass for “real design.”
Then you look closer.
The colours feel flatter than they did on screen. The edges don’t look crisp. Text that felt clean inside Canva suddenly feels slightly fuzzy in your hands.
And immediately the thought appears:
But it looked fine on screen.
This is the exact moment people start searching how to fix blurry Canva images for print. Not because the design looked bad while creating it – but because the disappointment only appears after the file becomes physical.
So naturally, it feels like something went wrong at the very end.
Most people assume they exported incorrectly. Others think the printer damaged the file. Some conclude Canva just “isn’t good for printing.”
However, none of those are actually what happened.
The truth is simpler – and much kinder to you as the designer:
Your screen was protecting you from a problem that already existed.
Digital design lives in a world where things scale fluidly. You zoom in, zoom out, resize the window, view it on a phone, then a laptop, then a tablet. Everything adapts. Everything still looks acceptable.
Print, in contrast, does not adapt.
Print commits.

The moment ink hits paper, your design stops being flexible and becomes physical reality. At that point, the file can no longer hide missing information – and that’s when blur reveals itself.
This is also why many people feel confused after following export tutorials perfectly and still getting soft results. Export settings absolutely matter; however, they are not where clarity is created. They only preserve whatever clarity already exists.
(We’ll go deeper into that in the export settings guide, because understanding what export does versus what design does is one of the biggest confidence unlocks for beginners.)
For now, hold onto this:
You didn’t break your design.
You discovered how print sees.
And that shift matters more than it sounds.
Because when something feels random, it feels uncontrollable. And when it feels uncontrollable, every new print order carries a little anxiety.
However, the moment you understand that blur follows rules, the emotional experience changes. Instead of wondering whether this file will “work,” you start asking better questions:
How large will this print physically be?
Where did this image come from?
Is this canvas the correct size from the beginning?
Those questions immediately move you from reaction to intention.
And intention is what separates hoping your design prints well from knowing it will.
Why print exposes what screens hide
Screens are designed to be comfortable for humans.
They display light, not pigment. They blend colours smoothly. They soften edges slightly so your eyes don’t strain. Even more importantly, screens constantly resample images – quietly adjusting detail so things look clean at many sizes.
As a result, your brain learns a habit:
“If it looks sharp here, it must be sharp everywhere.”
Print breaks that expectation.
Printers don’t interpret files. They reproduce instructions.
Every dot must physically exist. Every edge must be described precisely. Therefore, if information is missing, the printer cannot guess what you meant – it simply places the closest possible approximation.
This is where size and resolution finally meet each other.
A small image can look beautifully sharp on a laptop because the pixels are packed into a tiny viewing space. However, when that same image becomes a flyer or poster, those pixels spread across centimetres instead of millimetres. The detail hasn’t changed – but the physical space has. As a result, the gaps between information become visible.
This is the real reason the whole canva dpi print topic feels mysterious.
DPI sounds like a setting you turn on at the end. In reality, it’s a relationship between how big the design is and how much detail exists inside it – something that’s often misunderstood when moving from screen to print. Canva calculates that relationship automatically based on the canvas you create, which means your decisions at the beginning quietly shape the final print.
So when a design prints soft, Canva didn’t lower the quality. Instead, the paper simply asked the file for more detail than it contained.

Another way to understand this is to think about distance.
On a screen, you usually view a design from arm’s length or closer. The display is backlit, vibrant, and forgiving. Because of this, your eyes blend tiny imperfections automatically.
In contrast, printed materials are often viewed from varying distances. A flyer may be held close. A poster may be viewed from across a room. A business card may sit under bright lighting.
Therefore, print requires a higher level of structural integrity. It cannot rely on glow or scaling tricks. It must contain enough real information to hold up under scrutiny.
This is also why high-quality logos behave differently than low-resolution photos. Vector elements scale infinitely because they store mathematical instructions instead of pixel data. If you haven’t explored that distinction yet, the raster vs vector guide will make this entire resolution conversation click into place.
Once you see how different file types store information, you stop blaming Canva – and start evaluating assets more strategically.
If you’ve ever wondered why a logo looks crisp digitally but soft in print – or why photos behave differently than text – that’s because different elements store detail differently.
In other words, print isn’t unpredictable.
It’s literal.
And once you understand that, the behaviour stops feeling random. It becomes predictable.
Where blur actually comes from
Now that we know print reveals problems instead of causing them, the next question becomes obvious:
Where did the softness start?
Almost always, it began long before export.
The quiet impact of small images
The most common cause is also the least obvious.

An image enters Canva looking perfectly fine, so it feels safe to use. However, what you’re seeing is a preview scaled to your screen – not the amount of real detail available.
When printed larger, the design asks the image for information it never had. Canva can stretch it; however, it cannot invent texture or edge data that wasn’t captured originally.
This is why improving print quality in Canva starts at placement, not export. The moment an image is added, the future print outcome is already partially decided.
When designs change size later
Another frequent situation happens after the design is finished. A social post becomes a flyer. A small card becomes a poster. Visually, nothing seems to change, so it feels logical to reuse the file.
However, the physical size increased while the stored detail stayed identical.
As a result, people try to increase resolution in Canva or adjust quality settings. Unfortunately, resolution cannot be added afterward – only preserved beforehand. The file isn’t malfunctioning; it’s faithfully scaling limited information.
Format misunderstandings
Sometimes everything inside the design is actually fine. However, the export format compresses detail for convenience.
Screen formats are optimized to load quickly and display smoothly online. Printing, on the other hand, needs mathematical edge accuracy. Therefore, when Canva is blurry when printed, the file may simply be optimized for a monitor rather than paper.
(We’ll break down exactly when to use PDF Print versus JPG in the export guide, because format choice alone fixes a surprising number of cases.)
The surprisingly important canvas size
Finally, canvas dimensions matter more than most beginners expect.
Designing smaller and planning to enlarge later feels efficient. However, it quietly reduces density. Canva distributes detail according to the starting size you choose.
So the softness many people attribute to “bad export settings” actually originates at the moment the document was created.
And here’s the good news: because blur follows consistent rules, it’s fixable – not trial-and-error fixable, but predictable fixable.
However, there’s also a subtle psychological factor at play.
Canva makes resizing incredibly easy. You can duplicate a design, change dimensions, and continue working in seconds. Because the process feels seamless, it’s easy to assume the quality scales seamlessly too.
However, resizing a layout and resizing image data are two very different operations.
The layout adjusts beautifully.
The pixel data does not.
Therefore, while Canva appears flexible, resolution remains governed by physics. The software can rearrange elements effortlessly – but it cannot create detail that wasn’t captured in the first place.
Understanding that boundary prevents the most common “why Canva prints blurry” frustration loop: redesigning multiple times when the issue was image density all along.
The fixes people try first (and why they disappoint)
Once a print comes back blurry, most people don’t sit still – they experiment.
You export again.
You choose a different setting.
You try a different format.
You zoom in and hope the next file looks sharper.
It feels productive because something is changing each time.
However, the result keeps coming back the same.
This happens because the problem rarely lives in the export button. It lives earlier in the chain. Therefore, repeating the final step simply repeats the same outcome.
Re-exporting multiple times cannot add detail – it only repackages what already exists.
Enhancement tools behave similarly. On a monitor, sharpen and clarity settings appear to improve edges. However, enhancement increases contrast, not information. In print, that added contrast often outlines the softness instead of hiding it.
Resizing the file upward has the same issue. When a file stretches, pixels move farther apart. The printer then faithfully prints those spaces.
In other words, nothing is malfunctioning.
The printer is simply being accurate – even when that accuracy feels disappointing.
Once you shift your focus from the final step to the first step, solutions stop feeling random and start feeling reliable.
What actually fixes blurry Canva prints
The moment you work upstream instead of downstream, everything becomes simpler.
Instead of trying to rescue the file at export, you strengthen the information inside the file.
Start with the images. If Canva warns that an image may print blurry, it isn’t criticising you – it’s previewing the future. Replacing that image with a larger original often transforms the final print dramatically.
Next, create the document at the exact dimensions the print will be produced. When the canvas matches reality, Canva calculates density correctly without you needing to think about DPI at all.
At that point, export finally matters – because now it’s preserving clarity instead of trying to create it.
Choosing PDF Print keeps text and shapes mathematically sharp. As a result, many “Canva blurry when printed” problems resolve immediately.
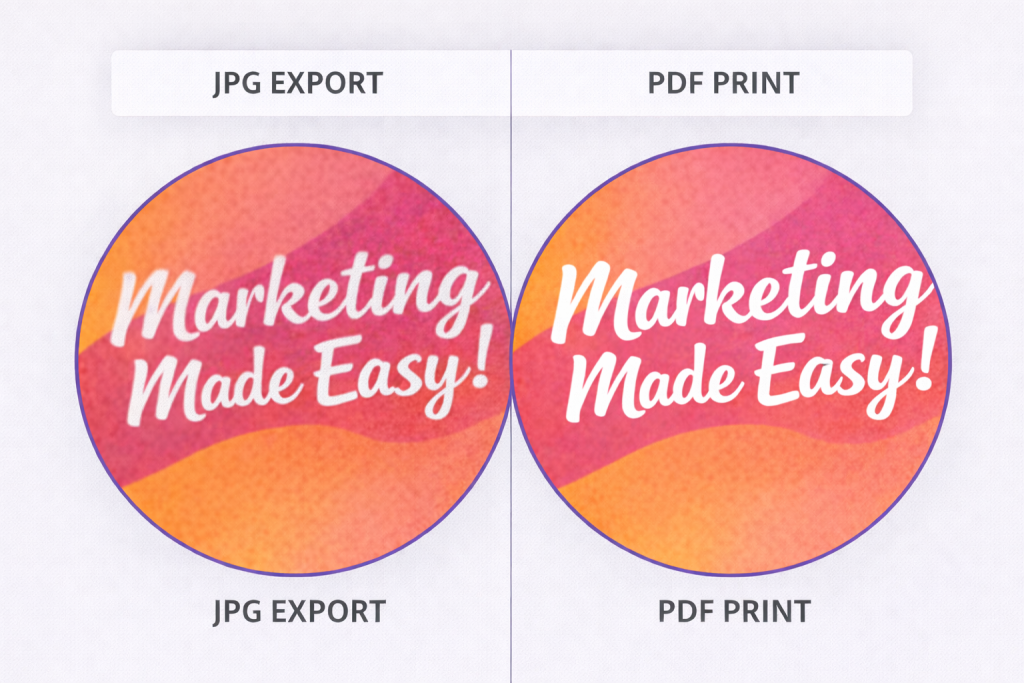
It’s also worth noting that text behaves differently from images.
When exported correctly, text and basic shapes remain vector-based inside a PDF Print file. That means they scale cleanly because they are described mathematically rather than pixel-by-pixel.
Images, however, remain pixel-based.
So if your text prints sharply but your photo looks soft, that’s not inconsistency – it’s confirmation. It tells you the file format is working correctly and the issue lies specifically with image resolution.
Once you recognize that pattern, diagnosing blur becomes far easier.
Instead of asking, “Why is everything blurry?” you begin asking, “Which element lacks detail?”
That single shift speeds up troubleshooting dramatically.
After exporting, there may be a final preparation step outside Canva. Not redesigning – simply preparing the file for physical production. Professional workflows separate creative layout from production packaging.
The pattern is consistent:
Clear source → correct size → correct export → optional finishing
If you try to fix export before fixing image quality, nothing improves. If you resize before correcting the canvas, density remains mismatched. However, when the steps happen in sequence, each decision strengthens the next.
As a result, improving print quality in Canva stops feeling technical and starts feeling systematic. And Because each step supports the next, the print outcome becomes predictable instead of hopeful.
Growing beyond the moment of frustration
At this stage, some people worry this means Canva isn’t suitable for print.
Actually, the opposite is true.
Canva is excellent at creation. Most blurry print issues disappear once size, source images, and export format align.
However, print workflows do have stages. As projects become more production-heavy, some stages benefit from tools built specifically for preparation rather than design.
Think of Canva as Version 1 space.
It’s where layout decisions happen and creativity flows quickly. Later tools don’t replace it; instead, they handle technical packaging when consistency becomes critical.
Therefore, moving beyond Canva isn’t about quality – it’s about workflow scale.
There’s something empowering about this moment.
At first, blurry prints feel like failure. Later, they become feedback.
They teach you how physical design behaves. They sharpen your eye for resolution. They strengthen your workflow.
In other words, this frustration is part of becoming more precise.
And precision is what turns casual design into confident design.
The calm truth
When a print first looks soft, it feels personal.
You remember the care you put into spacing and alignment. So seeing blur feels like a mistake you should have prevented.
However, nothing here was carelessness.
You encountered the boundary between two different visual worlds.
Screens prioritise comfort and flexibility.
Paper prioritises precision and permanence.
Once you understand how size, resolution, and source detail interact, you stop hoping prints will work – and start knowing they will.
You can predict clarity before exporting.
You can recognise risky images immediately.
You can fix blurry Canva images for print before spending money.
And that’s the real shift – not learning a trick, but gaining certainty.
Your design was never broken.
Print simply asked for more information than the screen required – and now you know exactly how to provide it, deliberately and confidently, before the ink ever touches paper.