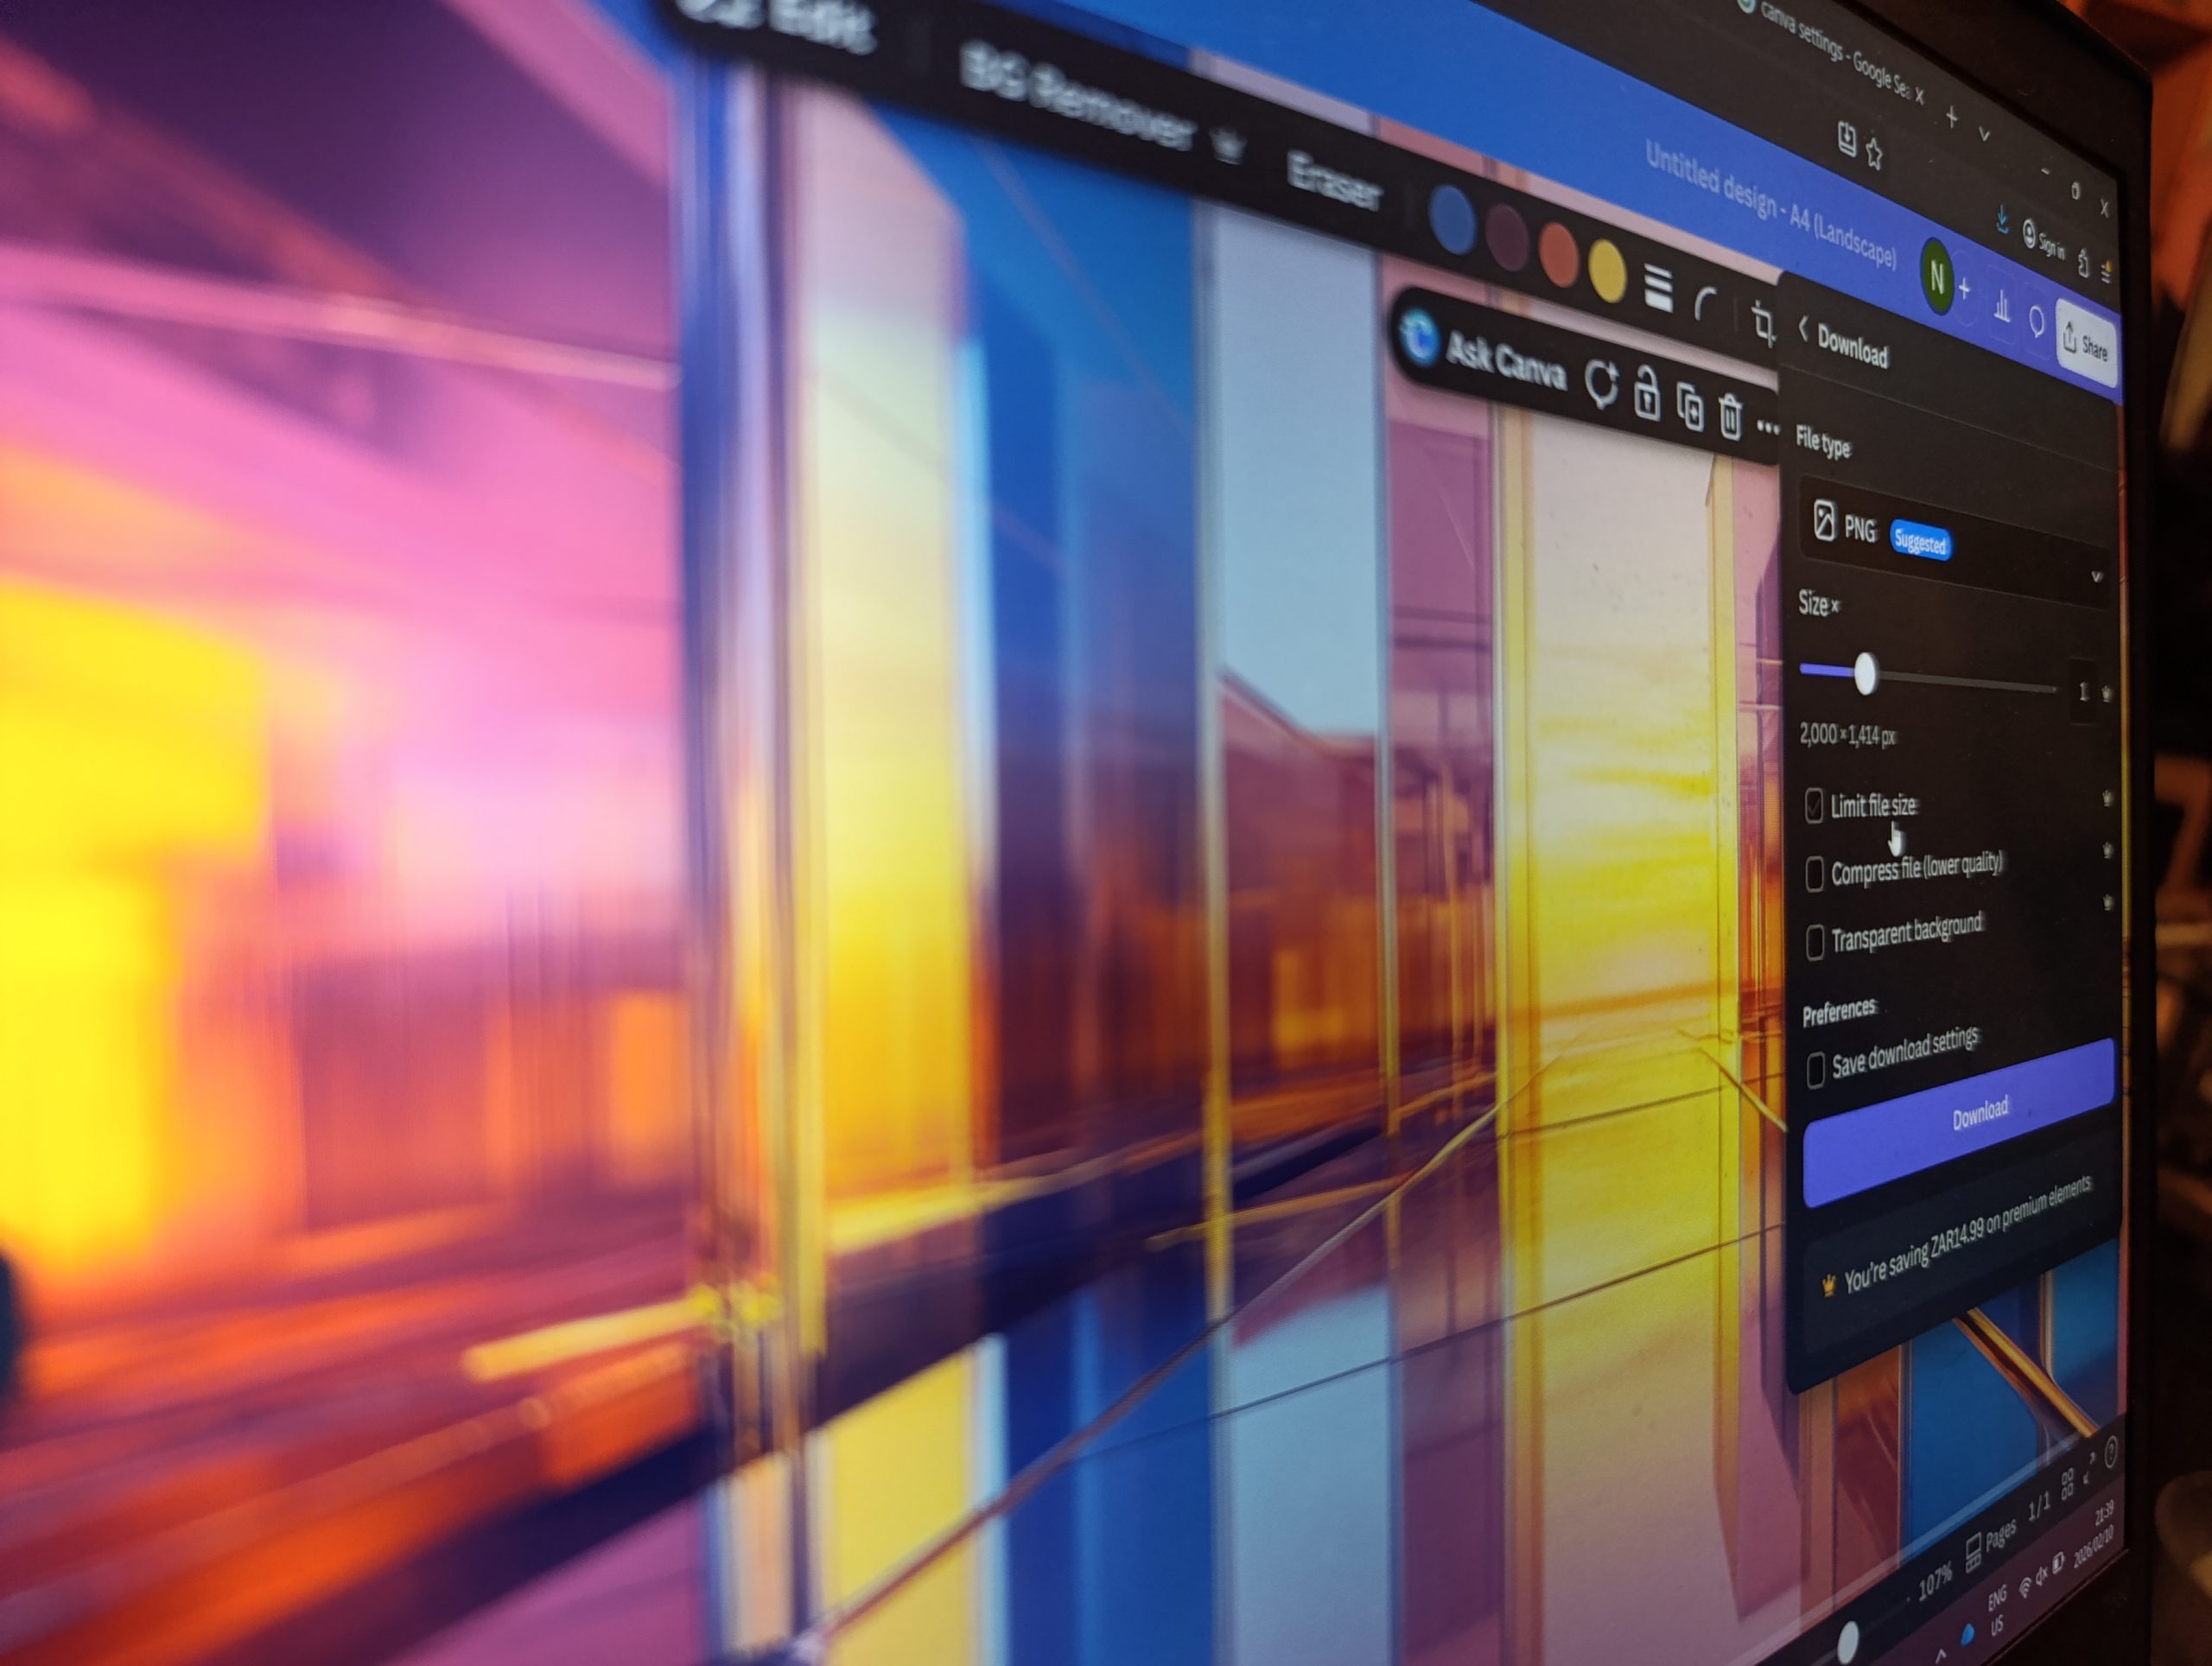
Canva Export Settings Explained (And How to Fix Them)
This guide explains which Canva export settings to use for screen, print and sharing so your downloads stay sharp.
You design something in Canva. It looks crisp. Clean. Beautiful.
You download it…
…and suddenly it feels softer. Slightly blurry. A bit off.
So you tweak the design, adjust the spacing, change the font… You download again.
Still off.
Here’s the frustrating part: The problem usually isn’t your design. It’s the export.
Canva gives you several download options – PNG, JPG, PDF Print, PDF Standard – but it never really explains when to use which one. So, most people pick the default and assume the design will look the same everywhere. Only, most of the time… it doesn’t.
This is actually one of the biggest reasons Canva designs lose quality after download – not because Canva is bad, and not because you did anything wrong – but because export settings quietly control how your design behaves outside of Canva.
So, if the design is already correct, the only place left for things to change is the moment it leaves Canva, right? Let’s make those settings finally make sense.
The “Default” Trap (aka. Why Canva Downloads Look Different After Export)
Canva is designed to be friendly, with a process that typically looks something like:
Open → design → download → done.
And honestly? For quick social posts, that works beautifully.
So naturally, people trust the default download button. PNG shows up first, the size looks fine, and Canva doesn’t warn you about anything. That creates a very normal assumption:
If it looks good in Canva, it should look the same everywhere else.
But Canva’s editor shows you a perfect preview. Real life has platforms, compression, printers, screens, and file handling – and each one expects a different kind of file.
So the default export isn’t necessarily wrong. It’s just generic. It doesn’t know if you’re:
- Posting to Instagram.
- Sending to a printer.
- Uploading to a website.
- Sharing with a client.
- Reusing it later at a different size.
And because Canva doesn’t ask… it guesses. That guess is where most quality problems begin. Not with design mistakes. Context mistakes. Which means that the problem usually isn’t the format you picked – it’s that Canva had to guess your destination.
Once you choose export settings based on where the design is going, quality issues drop dramatically – even with the exact same design.
The 3 Questions Canva Never Asks You
Before choosing a file type, one tiny pause changes everything. Instead of asking “What file should I download?” ask “Where is this design about to live?”
Every clear export decision comes from three simple questions.
1. Where will this be used?
Screen and print behave like different worlds. Screens display light, whereas print uses ink and paper texture. A file that looks perfect on a phone can look soft on paper, and a file prepared for print can look unnecessarily heavy online.
The destination decides the rules – not the design.
2. How big does it need to be?
Not the Canva size. The real-world size.
A design made for Instagram might later become:
- A poster.
- A presentation slide.
- A website banner.
The moment the display size grows, tiny details stretch. And stretching reveals quality limits. Most “blurry Canva” problems are actually “scaled beyond its purpose” problems.
3. Who else needs this file?
This one surprises people the most. You are not always the final viewer – sometimes you’re handing the file to a system or a person who needs flexibility.
Examples:
- A printer needs precision.
- A developer needs manageable size.
- A client may need to edit.
- A platform compresses automatically.
Different receivers prefer different file behaviors. Choosing for the receiver often matters more than choosing for yourself.
When these three answers are clear, the file type becomes obvious.
And suddenly Canva’s export settings stop feeling random, and they start feeling logical. Once those answers are clear, the file type stops being technical and starts becoming obvious.

File Types Explained (Like a Human)
Choosing between PNG, JPG and PDF in Canva decides how quality is preserved after download. Let’s make PNG, JPG and PDF finally behave like real words instead of mysterious buttons…
Canva shows you PNG, JPG and PDF – and most people pick one based on habit, or by default. These aren’t just file formats – they control behaviour. Each one decides how your design trades clarity, flexibility and size. Once you see what each file is trying to do, the choice becomes simpler.
PNG – the “keep it sharp” file
PNG protects detail.
Text edges stay clean. Shapes stay crisp. Transparency works. Colours stay stable. That’s why Canva puts it first – it’s the safest option for most on-screen graphics.
Use PNG when:
- Posting to social media.
- Uploading to a website.
- Sharing slides.
- Anything viewed on screens.
- You need transparent backgrounds.
PNG cares about clarity more than weight, so the file can be a bit heavier (in terms of file size) – but screens handle that beautifully.
Think of PNG as a screenshot that refuses to blur.
JPG – the “keep it light” file
JPG focuses on file size.
It gently blends pixels together to shrink the file. Photos (usually) handle this well. Text and graphics… less so. While the image still looks fine at normal viewing distance, sharp edges soften slightly.
Use JPG when:
- You need a small file size.
- You’re emailing images.
- You’re uploading many photos.
- Detail precision isn’t critical.
- You need opaque backgrounds.
JPG is efficient, not precise. It trades tiny detail for speed and compatibility – which is often exactly what you want for photography, and rarely what you want for typography.
PDF – the “this has a job to do” file
PDF isn’t really an image. It’s a container that tells other systems how to rebuild your design properly.
That’s why Canva offers two versions.
- PDF Standard
- Made for sharing and viewing.
- Keeps files manageable.
- Great for digital documents
- PDF Print
- Made for physical output.
- Preserves detail and accuracy.
- Prepared for printers and scaling.
Use PDF when the design needs to behave consistently outside Canva – especially when other people or machines will handle it.
If a printer is involved, PDF Print is almost always the right answer.
Once you match the file’s behaviour to its purpose, quality problems stop feeling random. And this is usually where people reach for the quality slider – hoping it will fix everything.
Now let’s clear up the scariest word in design settings: Resolution.
Resolution, Explained Calmly (Once)
“Higher quality” sounds like it should always be better. But resolution doesn’t mean better. It means denser. Canva’s quality slider affects resolution, but resolution only matters when the output size changes.
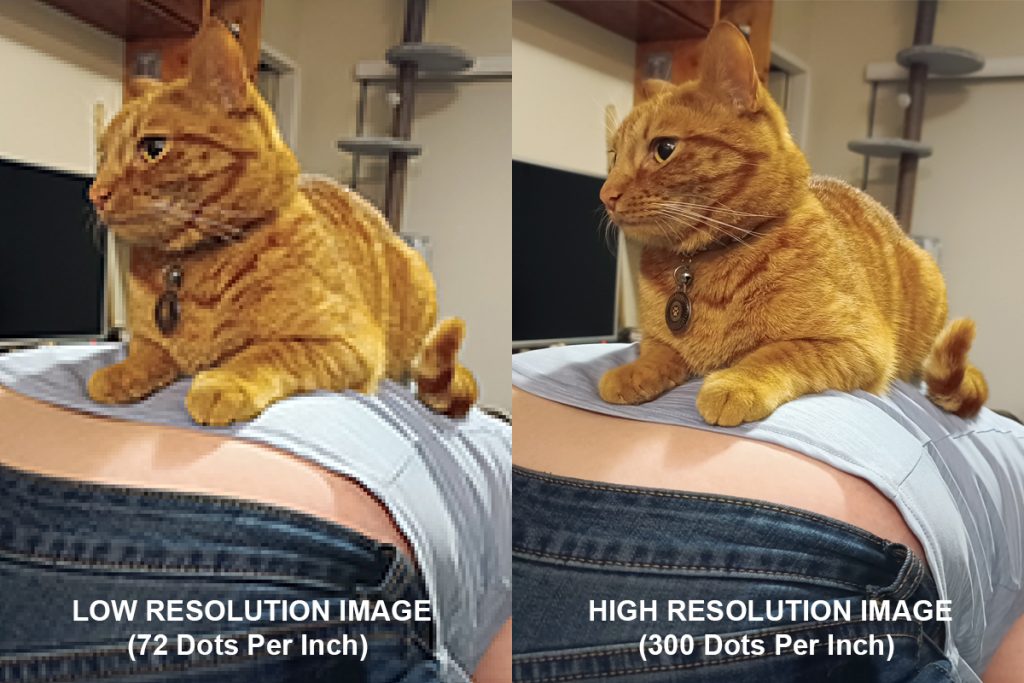
Resolution is simply how tightly detail is packed.
More detail helps when something is enlarged or physically printed. Extra detail does nothing when the display can’t show it, because there’s not enough room to pack more pixels. That’s why exporting everything at maximum quality doesn’t improve most results – it just makes files larger when they land on your drive.
What “quality” actually changes in Canva
In Canva exports, quality mainly affects how much detail is preserved when the design leaves the editor. Most blurry Canva exports come from using one file for multiple destinations.
It helps when:
- The design will be printed.
- The design will be enlarged.
- People will zoom in.
It matters far less when:
- The design stays the same size.
- The platform compresses it anyway.
- It’s viewed on a phone.
So higher settings aren’t wrong – they’re situational.
Why higher isn’t always better
Every platform reshapes images to fit its own limits; social media compresses, websites resize, e-mail services optimize.
Sending an ultra-dense file into a system that compresses it often produces more softness, not less – because the platform has to work harder to shrink it.
Balanced files survive processing better than oversized ones.
When it truly matters…
Resolution becomes important the moment the design enters the physical world because ink cannot invent detail that isn’t there, paper reveals softness immediately, and large formats magnify everything.
That’s where higher detail protects the result – and where the right file type (usually PDF Print) supports it.
So resolution isn’t a “make it perfect” slider. Rather think of it as a matching tool – match density to destination, and Canva suddenly behaves exactly the way you expected it to from the start.
Common Export Mistakes (and Quick Fixes)
Most Canva quality problems don’t come from designing badly; they come from reusing a perfectly good file in the wrong place.
Here are the usual culprits:
Downloading once and using it everywhere
You export your design once… and it becomes the master copy.
Instagram post → email header → print → WhatsApp → website banner.
Each platform reshapes it differently, but after enough reshaping, the design looks tired.
Canversion’s Advice:
Export per destination, not per design. This way, the design stays the same, and only the delivery version changes.
Printing social-media sized designs
A 1080px Instagram graphic looks sharp on a phone because the screen is small and bright. On paper, however, that same graphic stretches across physical space, causing detail to spread out, and that all-too-well-known softness appears.
Nothing broke – the file just ran out of detail for the job.
Canversion Tip:
Create a print-sized Canva document when the design is meant for paper.
Sending PNGs to printers
PNG is a screen specialist, but printers expect instructions, alignment and rebuildable elements. When they receive a flat image, they print exactly what they see – including that softness that screens hide.
The Canversion Approach:
Send PDF Print for anything physical.
Upscaling a small design later
The design worked perfectly… until it needed to become a poster, slide, or banner.
Scaling multiplies pixels, not detail.
The Canversion Pro-Tip:
Start with the largest realistic size the design might need. This way, downscaling for other media stays sharp, rather than facing upscaling struggles.
These are incredibly normal habits – almost everyone does them at first. And fixing just one usually improves results immediately. None of these were design problems – they were delivery mismatches.
The Important Part
Matching Canva export settings to the destination fixes most blurry or low-quality downloads. If your Canva download ever looked worse than your editor view, you didn’t mess up the design. You just might have exported a file that didn’t match its destination.
Canva gives you creative freedom, but the outside world has rules – screens, platforms and printers each read files differently.
Once the file matches the job:
- Screens stay crisp.
- Prints stay clean.
- Platforms stop softening details.
- You stop redesigning things that were already correct.
Better exports don’t require advanced skills. They just require one extra decision before downloading. And that single habit fixes a surprising number of Canva quality issues. But if you can match your Canva export settings to the destination, it will likely fix most of your blurry or low-quality downloads.
Exporting is only half of the clarity story – the other half starts inside the images themselves.
Where This Fits In
This article tackles one piece of the puzzle: how files leave Canva. Matching your Canva export settings to the destination fixes most blurry or low-quality downloads.
Once the file matches the job, Canva stops changing the result – screens stay crisp, prints stay clean, and you stop redesigning things that were already correct.
Exporting is only half the clarity story – next we fix the images themselves.